Print data
Check this!
First the basic standards:
1 No time for this page? Okay, so the very short version.
Please send a PDF/X, in page size + 3 mm bleed, no mounting surfaces. Crop marks are not required. Target profile: ISO Coated v2 for coated paper, PSO Uncoated ISO12647 (ECI) for uncoated paper.
However, based on many years of experience, we are certain that the following detailed instructions are more instructive, at least in the case of high quality standards and more specific requirements.
2 Data standard
Please deliver your artwork to us as PDF/X. This not only ensures the best compatibility of your data with our workflow, but also some general quality conditions, e.g. correctly convertible colour data, a defined final format frame and the embedding of all fonts used.
Our workflow supports all PDF/X standards. If in doubt, choose PDF/X-3.
| Standard / supports | CMYK + spot colours | alternative colour spaces | PDF transparencies |
|---|---|---|---|
| PDF/X-1 |  |  | |
| PDF/X-3 | | | |
| PDF/X-4 | | | |
3 Colour structure for offset printing
In your final artwork, colour definitions as process or solid are only a click away from each other, but in print this makes a considerable difference in effort. That's why we agree on a specific colour scheme in the order, which of course the artwork must also match.
For a standard colour print (4-colour Euroscale) you must not create any solids. If such colours appear through imported objects, please convert them. If we find solid colour separations that have not been agreed, we convert them to CMYK and give you a note with the approval print.
Definition of a full tone, e.g. in Quark 10. Not the colour model or the representation, but only a simple check box makes the difference!
Monochrome black is a special case of this standard colour printing where only black is used. So here the coloured process colour separations must be empty. Otherwise we convert the document to greyscale and give you a hint with the release proof.
Spot colours agreed in the order must be created as a full tone in the final artwork so that they are actually printed separately from the process colours. If the colour names do not match, we assume the order content on the basis of which we procured the colour. However, you will also receive a note with the approval proof in the event of such discrepancies.
If the print is agreed with a different black than that of the scale, the motif may still be on process black if this is easier for you. In case of doubt, the order text has priority.
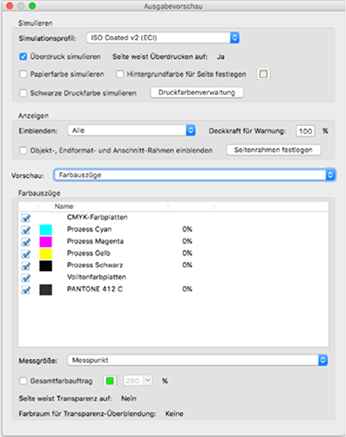
Check the colours in the Acrobat output preview, also with regard to content, by selecting and deselecting the colour separations individually.
4 Colour management for standard color printing
You should definitely deal with colour management, even if it is a technically demanding subject. We recommend the book PDF/X and colour management - the download or better still the printed edition, because it makes many details clearer.
Consistent colour management for print products does not require any information about the actual characteristics of colour reproduction in the print shop.
Instead, you choose a recognised standard process as the target profile for your work.
In the end, just like any other PSO-certified print shop, we factor our machine-, material- and process-related specifics into the output process in such a way that the standard (ISO 12647) is actually adhered to.
5 Target profile for standard color printing
Offset printing on premium coated paper has the ISO Coated v2 colour profile, which is ideal for printing on all types of image printing (matt, semi-matt, glossy) as well as on the coated side of chromosulphate and cellulose board. It is also relatively good for a cast-coated or heavily satinised surface, and for coated papers that are slightly more or less white, for example coated recycled paper.
Offset printing on uncoated, woodfree white standard paper, on the other hand, has the colour profile PSO Uncoated ISO12647 (ECI).
It is also suitable, usually with only minor deviations, for all other open uncoated papers that are more or less white. Small deviations from the standard process have to be accepted because sheetfed offset printing is only differentiated according to the two paper categories mentioned. Printing on through-dyed papers is, of course, profile-less because the CMYK colour space cannot be reproduced on them.
In contrast to offset printing, colour reproduction in digital printing is not significantly influenced by the paper type. Here you can always use ISO Coated v2.
You can download the current standard profiles from the ECI.
6 CMYK conversion for standard color printing
We are often asked when, i.e. at which point in the work, the data should be converted to the CMYK colour space for standard colour printing. In principle, this does not matter. Only within the framework of PDF/X-1a is it stipulated that this conversion takes place at your end, i.e. at the latest when exporting the final artwork. From PDF/X-3 onwards, other colour data may also be included, provided that their safe conversion is possible.
More important is how this conversion takes place, i.e. which method is used.
You can either organise this through consistent colour management or the conversion is carried out by our pre-press department in a relatively colourimetric way.
Colours that cannot be reproduced in print are shifted to the nearest outer point of the CMYK colour space, while all other colours are converted 1:1. This usually, but not always, leads to an optimal result. If you demand high quality, you have to say that this is one of the tasks of your image processing in Photoshop.
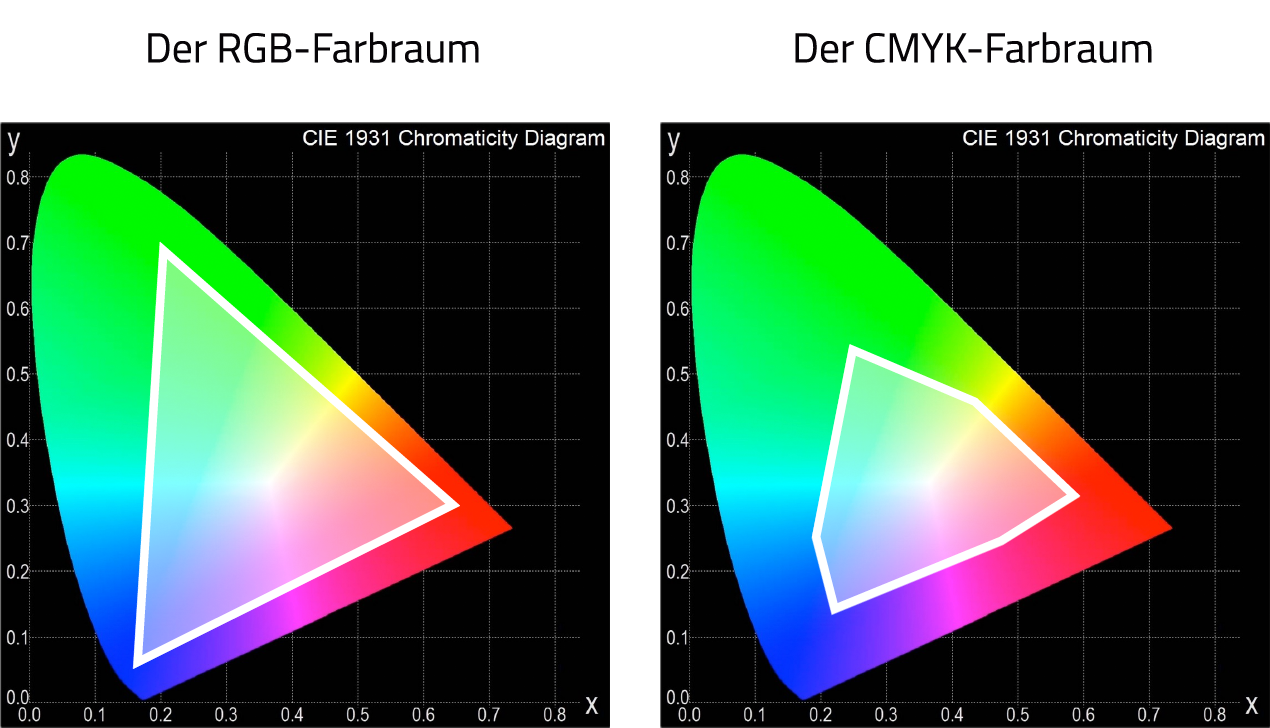
Many colour tones, such as a strong bright green, cannot be represented in the CMYK colour space, but are necessarily inadequately converted.
7 Image resolution
It is said that the image resolution in a print template should be about 300 dpi. This is often correct, but not always. Better statements can be made using the so-called quality factor, which indicates the ratio of the image resolution to its amplitude-modulated conversion for offset printing, i.e. its screen ruling. With the exception of posters and billboards, which are perceived at a high distance, this quality factor should never be less than 1.0. A little more won't hurt, but anything above a factor of 2.0 will have no effect other than exponentially increasing file size.
For example, an image resolution of 300 dpi would provide the optimal factor of 1.5 for conversion to an 80 l/cm raster (80 l/cm = approx. 200 lpi). For the conversion into a 120 raster, on the other hand, we would only have a factor of 1.0 at this resolution - i.e. borderline quality.
The table below shows our concrete processes and recommendations for image resolution. Please understand this as an approximate target.
| Process | Minimum | Recommendation | Maximum |
|---|---|---|---|
| Digital print | 180 dpi | 300 dpi | 400 dpi |
| Offset Uncoated (70 l/cm) | 180 dpi | 275 dpi | 360 dpi |
| Offset Coated (80 l/cm) | 200 dpi | 300 dpi | 400 dpi |
| Offset Coated Hybrid (120 l/cm AM + 21 µm FM) | 300 dpi | 450 dpi | 600 dpi |
| Large Format (+/- by viewing distance) | 25 dpi | 75 dpi | 150 dpi |
8 Transparencies
Transparencies are a powerful design tool, but afterwards they have to be dissolved, of course, because we are not printing transparent layers in real life, but more or less transparent colours. Similar to the CMYK conversion, the so-called transparency flattening is therefore also a necessary operation at some point in the process.
The PDF/X-4 data standard does support the retention of transparencies in the artwork, so their flattening only takes place in our workflow. However, we recommend that you perform transparency flattening yourself during the PDF export so that you can check the effect immediately afterwards in Acrobat. (When checking in the output preview, always simulate overprinting as well).
9 Overprinting
There is a very significant difference between whether a surface overprints the one below it or not. Advanced graphics programmes usually set this correctly: If a light colour lies over a dark one, the background is left out. But this can also be wrong, for example if the light colour draws a finishing shape. Conversely, if black text lies on an image or background, for example, the background is overprinted. This is correct and important because otherwise register problems can occur with small font sizes.
But the automatically set overprinting can sometimes lead to undesired effects (also in connection with transparencies). For example, two differently defined tones/planes can appear different, although they should actually form a homogeneous surface.
So pay particular attention to this difference, both in the definition (final artwork) and in the control (PDF), because the responsibility for this lies solely with you!
10 Trapping
No, please do not create trapping - that is the job of our pre-press department.
11 Format (Page size)
Please ensure that the page size, i.e. the final format frame in the PDF, corresponds to the product. If you deliver a poster that is supposed to be DIN A1 in DIN A4, we could scale it if necessary, but at a possibly considerable loss of quality. For products with many pages, scaling is also so time-consuming that we have to charge for it as an additional service.
For folded and punched sheets, you create the final artwork in the open state (open format). This also applies to covers that are bound via the spine (adhesive binding, etc.).
On the other hand, please create and deliver the contents of brochures, books or collections in the final format. Do not export them as "mounting surfaces" or "printed sheets", but individually and in exactly the order in which you want them to appear. The cover of a booklet brochure may be included in this page sequence.
The format of a book always means the book block over which the hard cover protrudes a little.
12 Bleed
A prerequisite for clean processing with motifs on the page margin is a bleed that extends beyond the final format frame on all sides, e.g. also in the binding of a brochure. This bleed area should be 3 mm on all sides, because this is a standard value in the industry and is sufficient for every printed product.
We do not require visible margin marks, but if you want to place crop marks, colour marks or similar, these must be outside the bleed area!
More specific topics
13 Covers for brochures of all kinds
For saddle stitching, wire comb binding, etc. you treat the cover and the contents the same, for a brochure whose cover is bound via the spine, you need a measurement from us.
For perfect binding, it is sufficiently accurate if we determine the spine thickness by calculation. We can give you this measurement at the latest after placing the order. Then create a separate layout with a width of 2 x final format + spine.
If the cover is also to be printed on the inside, draw it accordingly on the second document page, but take into account the so-called side gluing: on P2 on the right and P3 on the left, apart from the spine, 5 mm each are glued to the content, i.e. invisible. If necessary, pull the motif a little into this area, analogous to the bleed.
For thread sewing, we can estimate the spine thickness if the motif is not critical, i.e. if the spine connects homogeneously at least in one direction. Otherwise, the bindery has to make a white sample with original paper supplied by us, which takes at least 2-3 days.
14 Folded sheet layout for leaflets, folding cards, etc.
The basic layout of a folded print product appears and is usually simple, but you should make sure that the intended fold breaks are really correct. Nothing is more irritating than a simple flyer that cannot be folded in the intended places. Please also observe the following conventions.
Every fold layout has two pages representing the product in the opened state, whereby page 1 must contain the title of the finished product. It appears on the right-hand side of each fanfold, centre-parallel fold or wraparound fold. In a closed altar fold, the third leg from the left appears as the title. In a fanfold, the back is either on the far left of page 1 or on the right of page 2, otherwise always directly to the left of the title.
For a wraparound or gatefold, you must allow for a shortening of the inner legs of approx. 2 mm. This is absolutely unavoidable so that no inner layer bumps against the outer layer in the folding machine and thus buckles.
The shortening must be done successively for more than 6 pages, e.g. by the following widths in your layout on page 1 from right to left: 10 cm - 10 cm - 9,8 cm - 9,6 cm ...
Of course, this division must be set exactly the other way round on page 2, i.e. from left to right. We do not check the correctness of such simple standard products in our prepress department, because it is much easier for you to do this yourself by setting the correct guide lines in the final artwork.
If you are not completely sure, work with a dummy. This makes the functionality immediately apparent, for example the necessary truncations or the changing reading directions in more complex schemes with cross breaks.
15 Fold-out pages in brochures and books
Fold-out pages in the content and flap covers always require special consideration! In the content, the bound side must be shortened by approx. 2 mm so that the flap is not cut. Then the flap itself must be shortened further so that it is a good distance from the binding. This depends on the product and taste, but as a rule it should be 3 mm. So, for example, we would have 21 cm (final width) - 20.8 cm (bound in) - 20.5 cm (folded in).
For the cover of a booklet, it makes a significant cost difference whether the flap cover has to be flush or can be shortened by about 2 mm.
If the flap cover is flush with the back flap, for example, we have 21 cm - 21 cm - 20.7 cm for the outside from right to left, otherwise 21 cm - 20.8 cm - 20.5 cm.
Perfect-bound and thread-sewn booklets with cover flaps are normally produced flush. However, the side gluing must be taken into account. The flaps should therefore be shortened by at least approx. 1 cm. If the spine and flaps are motif-critical, you must definitely request a white sample from us!
16 Hardcover
For the purchase of a hardcover, you will receive an outline from us, which the bindery will determine on the basis of the original paper supplied by us. This can be done 2-3 days after placing the order at the earliest. Please read exactly what is written in this outline, also in the case of a round spine.
If the cover will not be printed, but e.g. will only be provided with a title embossing, we can dispense with the breakdown. Then simply supply the form with a placement indication.
The format of a book always means the book block, over which the cover protrudes a little. The front and back matter, if printed, has exactly the same format as the book block.
17 Displacement compensation in booklet brochures
With stitched booklets (with little effect generally with any folded ply) the pages are gradually pushed outwards from the cover to the inside sheet in proportion to the thickness of the paper and thus become narrower in the smoothly trimmed end product. You do not have to and should not worry about this, because manually taking this effect into account is error-prone and unnecessary.
Our prepress compensates for this effect.
In doing so, we take the manufacturer´s specifications for paper thickness as our starting point and we apply the naturally correct method of displacement compensation, namely scaling from the outside to the inside. We leave the outermost four pages unchanged, i.e. the cover in the case of a booklet. Then we successively slim the pages inwards. So the displacement is compensated by a slight lateral scaling.
In the reading view, which you receive from us for the final print approval, you can see the displacement compensation by means of the dash lines.
18 Tooling and finishing dies for punching and partial finishing
Your drawing of die-cutting or embossing dies and for partial print finishing must always be a vector graphic, usually as part of the print data in a special solid colour. Name them clearly ("die cut", "perforation", "spot varnish", "silver foil", etc.) and make sure that these drawings are set to overprint so that they do not affect the underlying print motif.
With foil stamping this is also factually important, because it completely covers the print underneath. So here the recess would only be a potential quality problem due to register difference.
All products that are die-cut and finished into a three-dimensional form should be professionally developed and verified. Of course, this is no longer necessary for standard boxes, archived tools and moulds that are freely available in our download area.
If a tool form comes from us or has been drawn separately in advance, you must also place it in the final artwork so that the print motif fits, but it must not be changed because the tool already exists or is in production.
For simple, parallel creases or line perforations, especially for pre-creasing fold breaks, there is no need for an explicit drawing in the artwork because no tool needs to be built for this. Only if the line position is not clearly defined by the folding scheme should you mark it - preferably in the same way as for toolmaking.
19 Climate protection sign for climate neutral printing
The mark for climate neutral printing is generated individually for each production. We can therefore only make it available after the order has been placed, when we finalise the greenhouse gas emission and choose a climate protection project that will benefit from the compensation of this CO2 amount. Even if the reprint remains unchanged, we will therefore have to purchase a new certificate and should therefore also update the associated label.
The compensation is immediately published by our provider ClimatePartner under a unique identification number. For the label that we send you, there is a form of presentation with or without a QR code, which leads directly to proof of compensation. The label may be freely scaled and displayed in the printed product without further ado, i.e. without approval by us or ClimatePartner.
20 FSC seal by Spreedruck
We have made the common forms of presentation of the FSC label available for you on our download page. Download the appropriate archive, depending on the certification, page format and desired language. The certification is stated in our product description. If the page format is up to DIN A5 or if you have a justified interest in a smaller presentation, namely for letterheads, you can use the more compact mini version. Otherwise, please use the standard full label.
Each archive contains eight permissible forms of representation. Colour changes are not permitted. If you are printing in four colours, you should choose a green version, otherwise a black one.
Place the sign straight, separate and legible. If it is on a background that makes it difficult to read, set it apart with a white border. Also keep a distance from other content at least equal to the height of the FSC initials. Avoid giving the impression that the FSC has anything to do with the content or purpose of the printed product. For example, do not place the mark in equal prominence with a sponsorship bar. Respect the minimum size of the seal and scale it only proportionally.
We have to obtain a print release from the FSC for the reproduction of the sign. If you have a very tight schedule, this can be critical, but there is a solution for this: Send us only the page with the FSC label, e.g. the imprint, 1-2 working days before the printing deadline. This page must be graphically ready, but can still receive any text updates and corrections up to the print data deadline.
21 Personalisation
Please send us personalisation data as an Excel or Excel-compatible file. It is very important that there are no line breaks within cells. Multi-line cells lead to errors in the following data process. They can only be resolved with great effort and manual control.
Therefore, please organise address fields in such a way that each hard line break, for example between company and department, is mapped by a separate column. Soft breaks in very long names are automatically generated by the formatting. Fields within an address line, for example postcode and city, can be kept separate or combined into one column.
If the personalisation job contains a salutation, we need either the entire wording or the appropriate information in individual columns, e.g. academic title, family name and a gender indicator.
For a barcode or QR code, you only need to write the content to be encoded in a column. We generate barcodes simply by using a special font, for QR codes we have an image generator.
In the rare case of image personalisation, you supply all graphic files in a flat directory as well as a reference column in the personalisation table containing the pure file names.
For sequential numbering, of course, we do not need a personalisation table, but only the start number.
You can tell us the desired layout either by formatting instructions or as a sample layout separate from the actual print template.
22 Data transmission
You can send your data in any size via email to daten@spreedruck.de. Your outgoing email may be subject to a size limit.
In that case, we recommend sending via WeTransfer or a similar service. Of course, we are also happy to follow a link to download from your server.
Need to know more?